SNUCSE GPU Service 3.0
SNUCSE GPU Service (SGS) 3.0 is a free service provided to students in the SNU CSE department. Before using this service, make sure you read this manual very carefully.
This service is provided for research purposes only. Please limit your use to the reasons stated in your workspace application form.
Links
- Workspace management page:
sgs.snucse.org - Registry:
sgs-registry.snucse.org - Dashboard
sgs-dashboard.snucse.org
Best-Effort
This service is provided on a best-effort basis. Bacchus volunteers will try our best to ensure smooth operations for everyone, but service may be interrupted either due to technical issues, maintenance, or because the resources are in use by another user.
Your containers may be terminated, without warning, at any time. To prevent data loss, ensure all important data is stored in persistent volumes. We cannot recover lost data from terminated containers.
Resource policy
There are two types of quotas: guaranteed (including GPU and storage) and limits.
Guaranteed resources, when assigned to a running pod, are reserved exclusively for the container for the duration of its run-time. This means that even if your container is completely idle, other users will not be able to use those resources.
If we discover over-allocation of guaranteed resources (including GPUs), without actually using the resources, we may take appropriate action, including:
- Terminating the offending containers
- Disabling your workspace
- Restricting access to this service permanently
Limits are the maximum amount of resources that can be used across all containers in the workspace. These may be overcommited, and we cannot guarantee that compute resources will be available to you unless you use guaranteed quotas.
Cleanup
Bacchus may periodically clean up old workspaces to free up resources. Specifically, we plan on performing cleanup operations at the following times:
- At the beginning of the spring/fall semesters
- At the beginning of the summer/winter breaks
We will contact users before performing any cleanup operations. If you do not respond in time, your workspace will be first disabled and later deleted. We cannot recover lost data once your workspace has been deleted.
Security policy
As a general rule, each workspace has similar security properties to running on a shared Unix machine with other users.
For example, other users may be able to see the following:
- names of your pods and containers
- images being run in your containers
- command lines of processes running in your containers
However, the following information is hidden from other users:
- the contents of your persistent volumes or ephemeral storage
- contents of your secrets
- your container logs
If you intend to test the security of the service, please inform us in advance.
Contact
SGS is developed and maintained by volunteers at Bacchus. If you have any questions, please reach out to us at contact@bacchus.snucse.org.
Changes from 2.0
If you have used the SGS 2.0 service, you may notice some changes in the 3.0 service.
Workspace request
We have developed a unified workspace and quota and management system. You can now request a workspace directly from the web interface. You no longer need to create UserBootstrap objects to create resource quotas.
Nodes
We now manage multiple nodes in a single cluster. Each node belongs to a
nodegroup (undergraduate or graduate), and each workspace is assigned to a
nodegroup. Pods in your workspace are automatically modified to only run in
nodes in your nodegroup. If you need to run on a specific node, use
nodeSelectors in your pod configuration.
Resource model
We no longer grant guaranteed CPU or memory (request) quotas by default. If you are absolutely sure you need request quotas for your use-case, you must justify your request in the workspace request form.
Pod CPU and memory limits are now automatically set to your workspace quota value using LimitRanges. If you need to run multiple containers (multiple containers in a pod, multiple pods, or even both), adjust the limits in your pod configuration.
Permissions & collaborating with others
Users can now query node details. You no longer need to contact Bacchus to check the status of available node resources.
Multiple users can now be added to a single workspace. If you are collaborating with multiple users, for example for coursework, you can now share a single workspace.
We now enforce the baseline Pod Security Standard. Contact us if this is too
restrictive for your use-case.
Registry
Harbor projects are now created automatically upon workspace approval. You no longer need to create the project manually.
We now automatically configure imagePullSecrets for your workspace under the
default ServiceAccount. You no longer need to configure this manually, or
specify imagePullSecrets in your pod configuration.
Resources and Eligibility
For undergraduate researchers
Eligibility
We offer SNUCSE GPU Service to SNU undergraduate researchers who meet one of the following criteria:
- Enrolled in Computer Science and Engineering as Single major.
- Enrolled in Computer Science and Engineering as one of their double majors or one of their minor(s).
- Student in the College of Liberal Studies, majoring in Computer Science.
Node group
The node group for undergraduate researchers includes the “ford” and “ferrari” nodes.
- ProLiant XL645d Gen10 Plus “ford”
- NVIDIA A100 40GB x 4
- AMD EPYC 75F3 x 1, 64 threads
- 768GB DDR4
- ProLiant XL675d Gen10 Plus “ferrari”
- NVIDIA A100 80GB x 8
- AMD EPYC 7763 x 2, 256 threads
- 1024GB DDR4
For graduate researchers
Eligibility
We offer SNUCSE GPU Service to SNU graduate researchers who meet one of the following criteria:
- Enrolled in Computer Science and Engineering.
- Enrolled in Interdisciplinary Program in Artificial Intelligence, with an advisor affiliated with the Department of Computer Science and Engineering.
Node group
The node group for graduate researchers includes the “bentley” node.
- NVIDIA DGX A100 “bentley”
- NVIDIA A100 40GB x 8
- AMD EPYC 7742 x 2, 256 threads
- 1024 GB DDR4
Request a workspace
Before continuing, you must already have a SNUCSE ID account registered in the
undergraduate,graduate, orprofessorgroup.
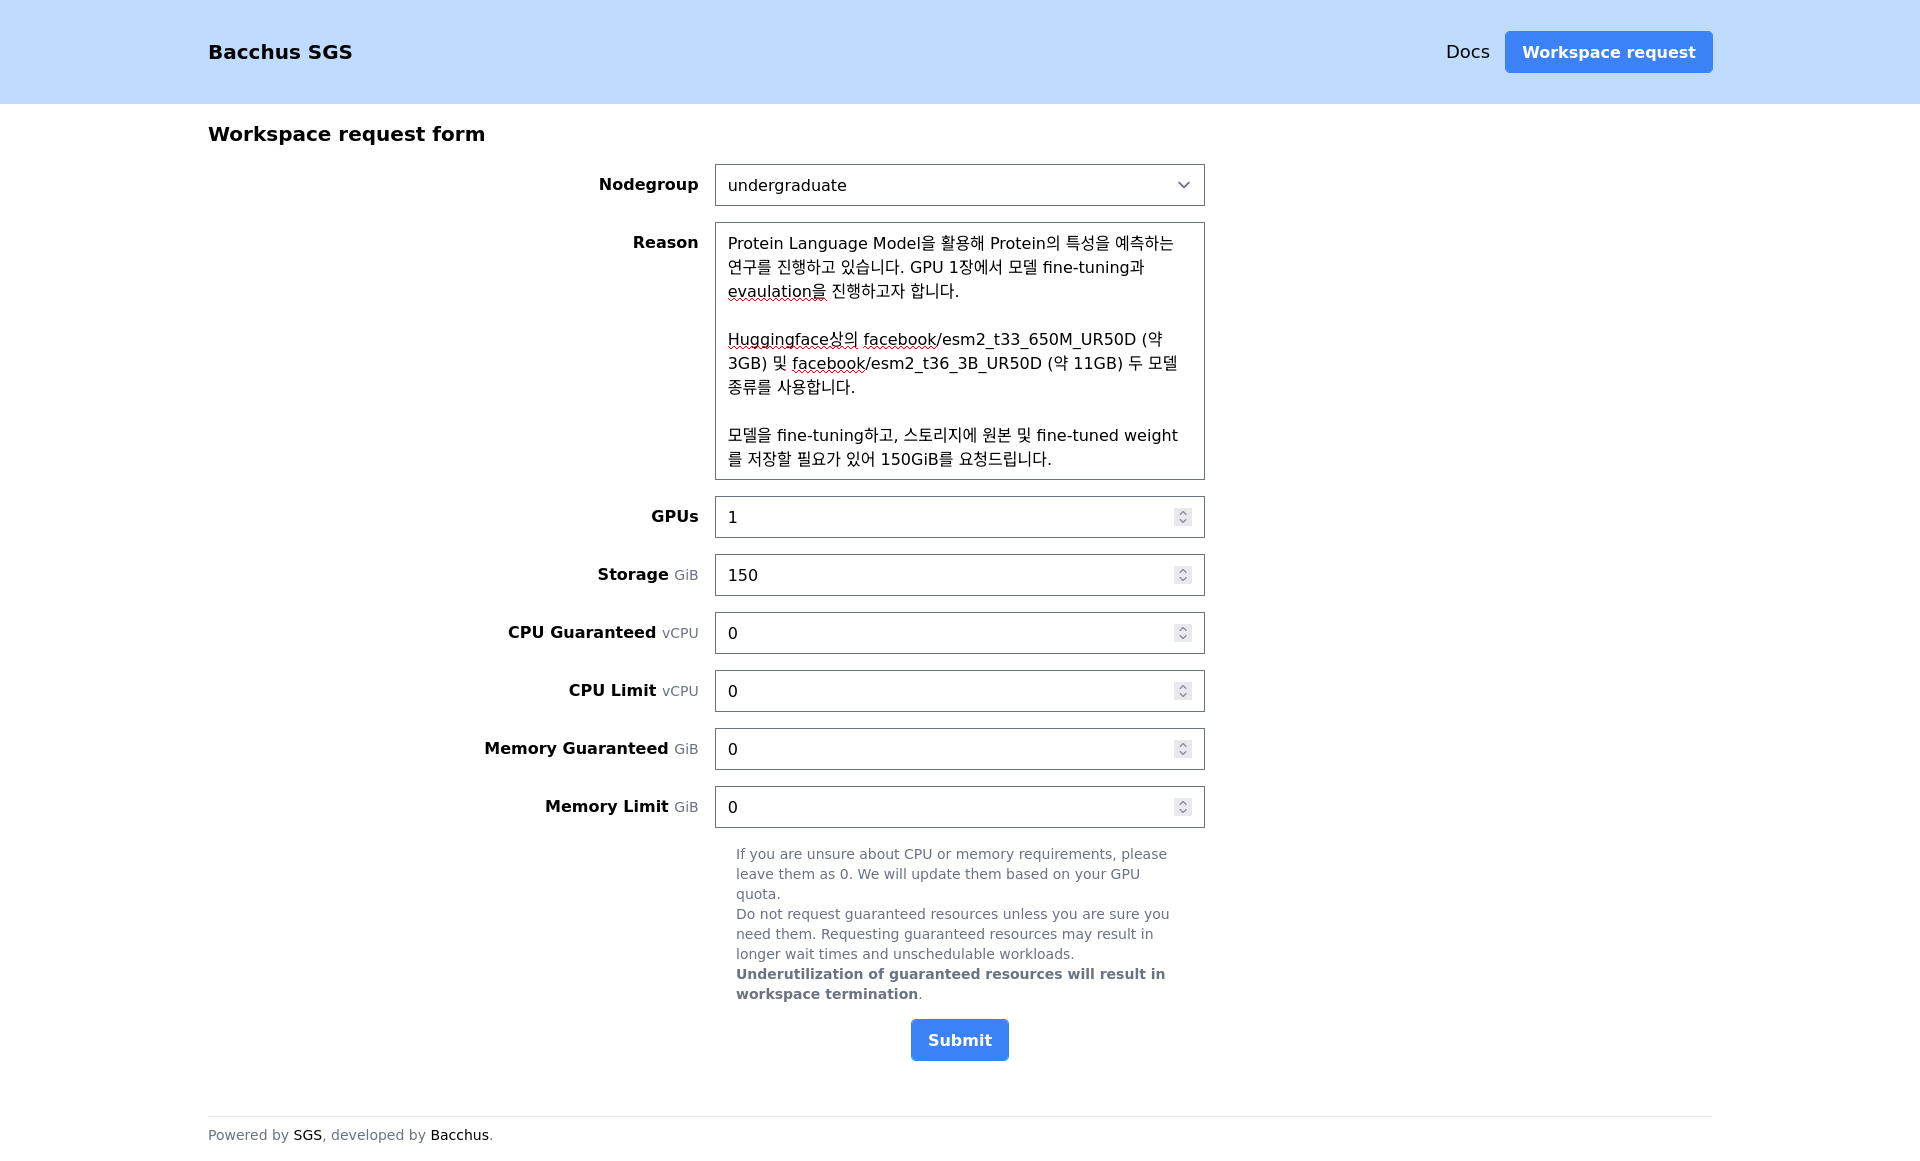
To request a workspace, fill out the Workspace request form on the SGS workspace management page.
After submitting the form, your workspace will be in the “Pending approval” state.

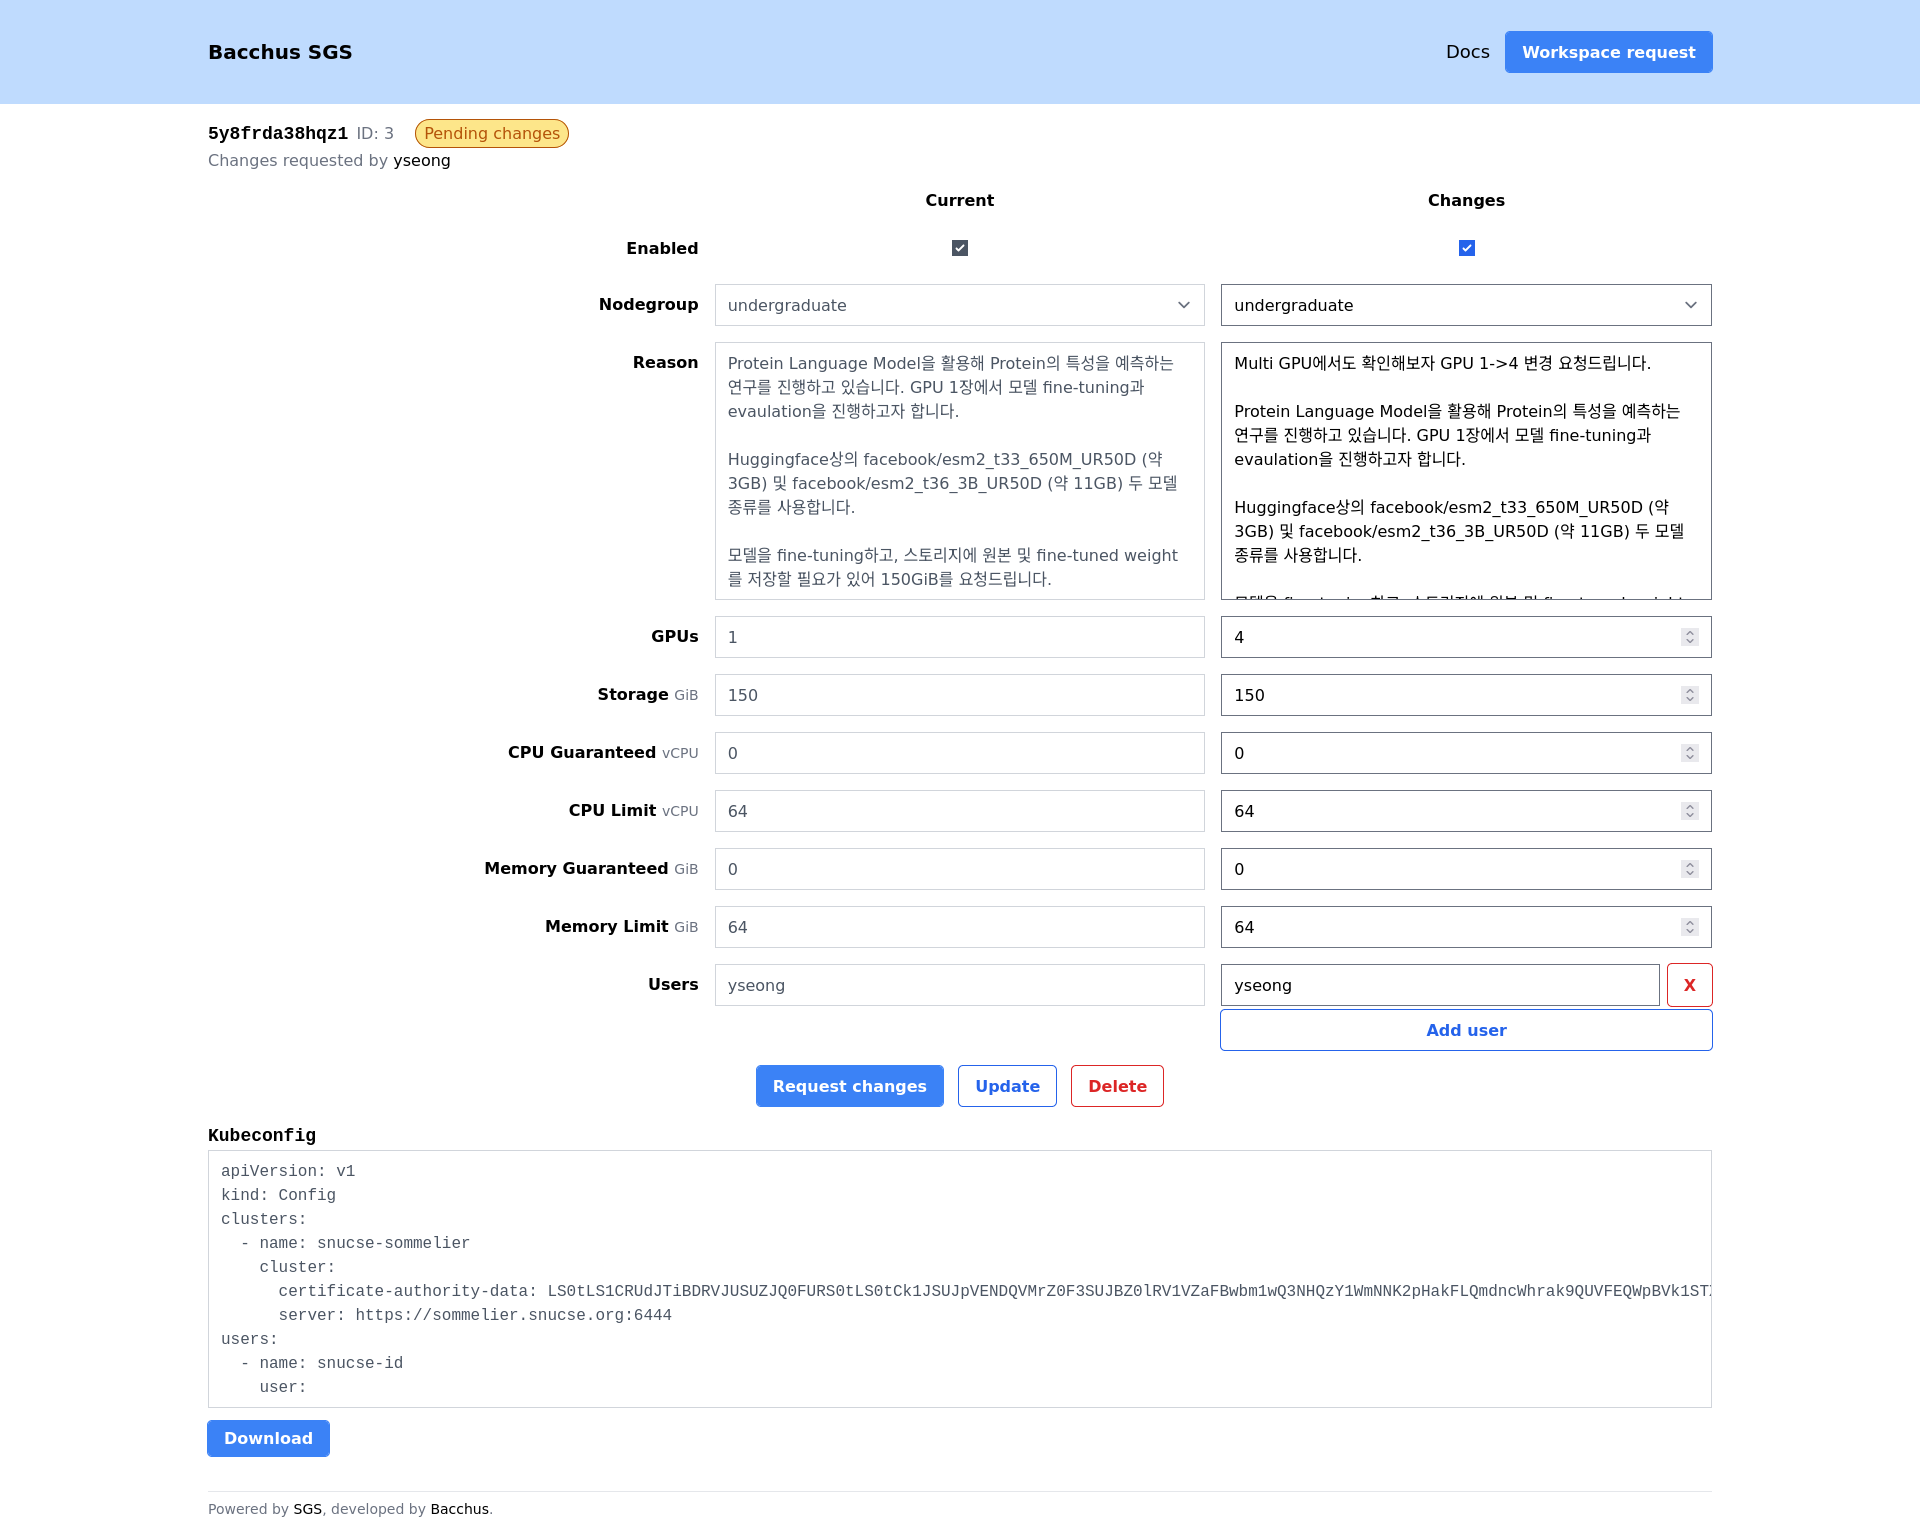
Your workspace request will be reviewed by Bacchus volunteers. Once approved, your workspace will transition to the “Enabled” state.

You may request updates to your quota or the users list at any time. Use the “reason” field to explain the purpose of the change. Similar to workspace requests, change requests will be reviewed by Bacchus volunteers.
GPU Resource Allocation Request Guidelines
Important: In order to ensure that our limited GPU resources are allocated in an optimal and transparent manner, we require all researchers to provide a clear and concise justification for their resource requests.
When submitting a request for GPU resources, please provide a concise explanation of how the allocated resources will be utilized to support your research objectives. This justification should include:
- If you are requesting a workspace in
graduateNodegroup, it is mandatory to provide the name of your advisor and/or the name of the principal investigator (PI) of the project. - A brief overview of your research project, including its goals and objectives.
- If you (or your team) are targeting a specific journal or conference, please include the CfP(Call for Papers) URL.
- This may help us to prioritize your resource request accordingly if the deadlines are nearer.
- A description of the specific GPU resources required, including:
- A brief description of workloads, you are going to run on the GPU(s).
- If you are requesting multiple GPUs, please provide detailed justification with regard to VRAM requirements or research challenges.
- A description of your storage requirements. Explain why you need a specific amount of storage by providing the details on:
- The size of the model (i.e. the approximate number of model parameters)
- The size and number of datasets.
- Any specific storage-related constraints or limitations.
- If you entered non-zero values to ‘CPU Guaranteed’ or ‘Memory Guaranteed’, please provide a detailed justification for your request.
- In most cases, you don’t need to obtain guaranteed CPU or Memory resources, and guaranteed resources only increase the risk of your workloads being terminated due to underutilized guaranteed resources.
- An estimate of the expected duration of the project.
Applications may be submitted in either Korean or English, and our reviewers will be able to assess them in either language.
Why this is important?
As system administrators, we are accountable to the CSE department for ensuring that our GPU resources are allocated in a way that maximizes their impact on research projects. By providing a clear justification for your resource requests, you are helping us to:
- Evaluate the merits and urgency of each request and prioritize allocations accordingly.
- Report to the CSE department on the effective utilization of our GPU resources and the impact on research outcomes.
- Continuously improve our resource allocation processes to better support the research community.
Thank you for your understanding, and please feel free to reach out to us at contact@bacchus.snucse.org.
Configure access
Install CLI tools
In order to access our cluster, you need to download and install Kubernetes CLI
tooling (kubectl) and the authentication plugin
(kubelogin). Refer to the linked pages for installation
instructions.
Verify CLI tool installation
Verify your CLI tools were installed with the following commands. Your specific version numbers may differ.
$ kubectl version --client
kubectl version --client=true
Client Version: v1.30.1
Kustomize Version: v5.0.4-0.20230601165947-6ce0bf390ce3

$ kubectl oidc-login --version
kubelogin version v1.28.1
Download the kubeconfig file
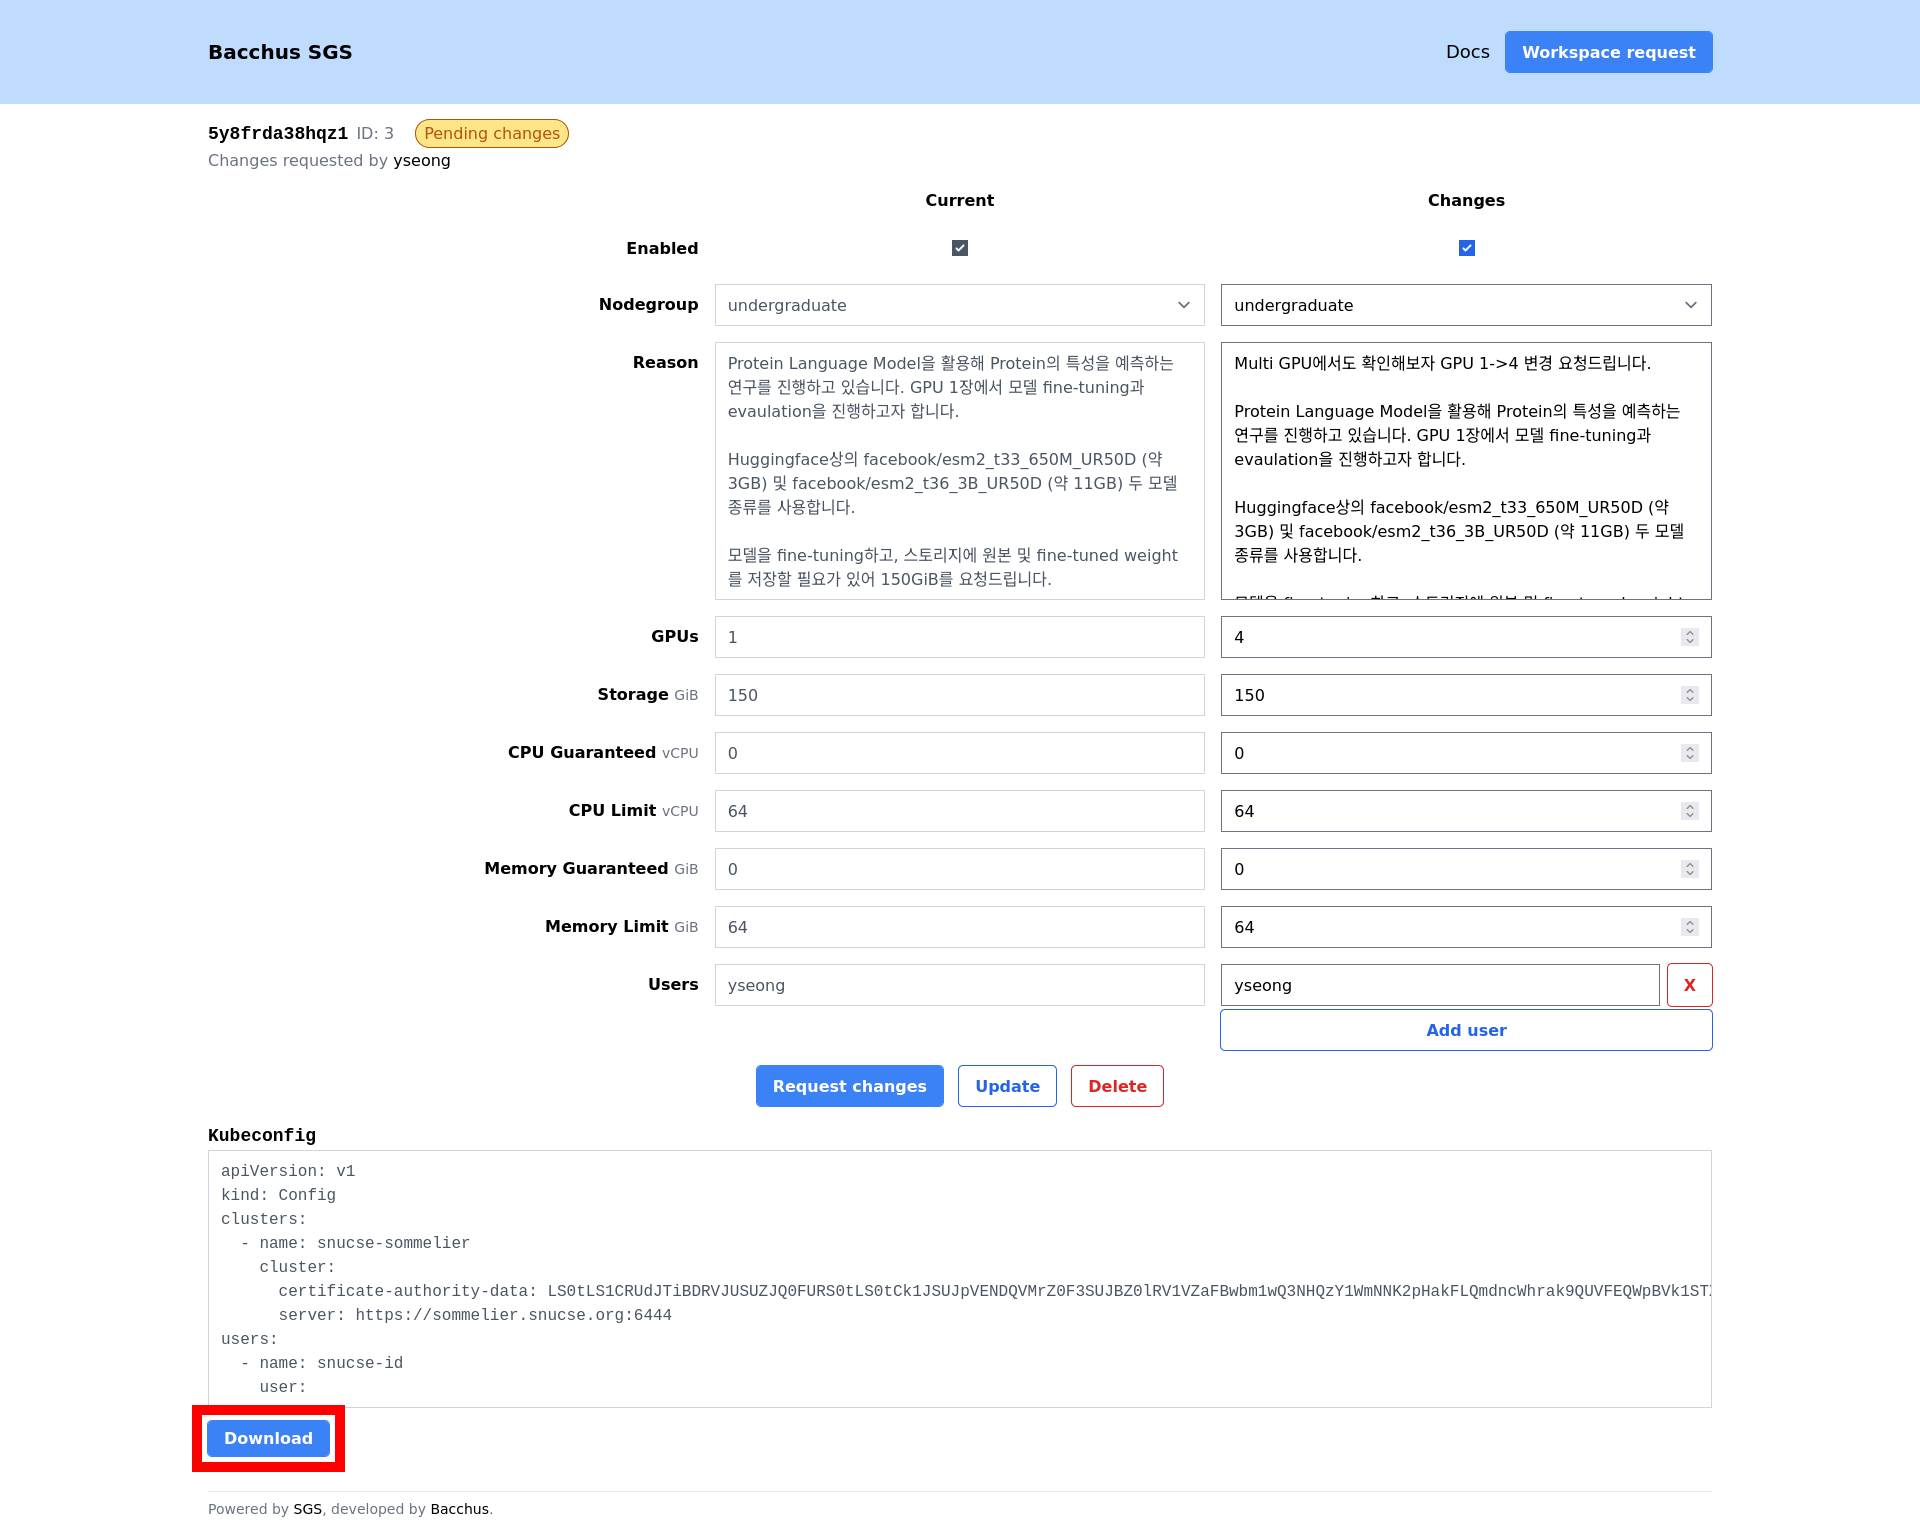
Open the SGS workspace management page and navigate to your workspace. Click the download button at the bottom of the page to download the kubeconfig file.
Place your downloaded kubeconfig file in the default kubeconfig location
- Unix (Linux, MacOS):
~/.kube/config - Windows:
%USERPROFILE%\.kube\config
Verify your configuration
Use the kubectl auth whoami command to check everything is working correctly.
It should automatically open a browser window to log in to SNUCSE ID. After
logging in, you should see something similar to the following output:
$ kubectl auth whoami
ATTRIBUTE   VALUE
Username    id:yseong
Groups      [id:undergraduate system:authenticated]
Query node details
Query the list of nodes available to you using kubectl:
$ kubectl get node --selector node-restriction.kubernetes.io/nodegroup=undergraduate
NAME      STATUS   ROLES    AGE    VERSION
ferrari   Ready    <none>   21h    v1.30.9
ford      Ready    <none>   331d   v1.30.4

$ kubectl get node --selector node-restriction.kubernetes.io/nodegroup=graduate
NAME      STATUS   ROLES    AGE    VERSION
bentley   Ready    <none>   215d   v1.30.2
Your containers will automatically be assigned to one of the nodes your workspace’s nodegroup.
To query the available resources in your node, you can use the kubectl describe node command.
$ kubectl describe node bentley
Name:               bentley
[...]
Allocatable:
  cpu:                256
  ephemeral-storage:  1699582627075
  hugepages-1Gi:      0
  hugepages-2Mi:      0
  memory:             1056508660Ki
  nvidia.com/gpu:     8
  pods:               110
[...]
Allocated resources:
  (Total limits may be over 100 percent, i.e., overcommitted.)
  Resource           Requests   Limits
  --------           --------   ------
  cpu                100m (0%)  64 (25%)
  memory             10Mi (0%)  64Gi (6%)
  ephemeral-storage  0 (0%)     0 (0%)
  hugepages-1Gi      0 (0%)     0 (0%)
  hugepages-2Mi      0 (0%)     0 (0%)
  nvidia.com/gpu     4          4
In the above example output, you can see that bentley has the following
resources available in total:
| Resource | Allocatable | Allocated (Requests) |
|---|---|---|
| CPU | 256 vCPUs | 0.1 vCPUs |
| Memory | ~1TiB | 10 MiB |
| GPU | 8 GPUs | 4 GPUs |
Use the registry
We provide a per-workspace private registry for your convenience. You can access
the registry at sgs-registry.snucse.org.
The registry shares a high-speed network with the cluster, so image pulls from the registry should be significantly faster than pulling from public registries such as nvcr or dockerhub.
Authenticate to the registry
- Log in to the registry web interface at
sgs-registry.snucse.org. - Click your account name in the top right corner.
- Click “User Profile”.
- Copy the “CLI secret” from the profile modal.
- Configure your Docker client to use the registry:
$ docker login sgs-registry.snucse.org -u <username> -p <cli-secret>
Push images to the registry
Navigate to your workspace project’s “Repositories” tab and refer to the “Push command” section for instructions on how to push images to the registry.
$ podman tag my-image:latest sgs-registry.snucse.org/ws-5y8frda38hqz1/this/is/my/image:my-tag
$ podman push sgs-registry.snucse.org/ws-5y8frda38hqz1/this/is/my/image:my-tag
Use images from the registry in your workspace
We automatically configure your workspace with the necessary credentials to pull images from your workspace project.
$ kubectl run --rm -it --image sgs-registry.snucse.org/ws-5y8frda38hqz1/this/is/my/image:my-tag registry-test
Do not delete automatically configured sgs-registry secret. It cannot be
recovered once deleted.
Run your workload
Check out the examples page to get started.
Storage
Your container’s root filesystem is ephemeral and everything on it will be lost when the container is terminated. Also, each container is limited to 10 GiB of ephemeral storage. If your workload exceeds this limit, the container will be automatically terminated.
$ # run a container that writes to the ephemeral storage
$ kubectl run --image debian:bookworm ephemeral-shell -- bash -c 'cat /dev/zero > /example'

$ # after a while, the pod gets killed automatically
$ kubectl get events -w | grep ephemeral
0s          Normal    Scheduled             pod/ephemeral-shell           Successfully assigned ws-5y8frda38hqz1/ephemeral-shell to bentley
0s          Normal    Pulled                pod/ephemeral-shell           Container image "debian:bookworm" already present on machine
0s          Normal    Created               pod/ephemeral-shell           Created container ephemeral-shell
0s          Normal    Started               pod/ephemeral-shell           Started container ephemeral-shell
2s          Warning   Evicted               pod/ephemeral-shell           Pod ephemeral local storage usage exceeds the total limit of containers 10Gi.
2s          Normal    Killing               pod/ephemeral-shell           Stopping container ephemeral-shell
We strongly recommend that you use persistent volumes for your data. For details, see the persistent volume example.
If you need to install large runtimes (Python libraries through pip, etc.), we
recommend building your image with the dependencies pre-installed. You can use
our private registry to host your images.
Examples
Recommended workflow
To use the available resources efficiently while ensuring your data is safely preserved, we recommend the following workflow:
- Create a working pod without GPU resources to work on your code. Ensure you are saving your work in a persistent volume. See the Persistent volume example.
- To test and debug your code, use a GPU shell. See the GPU shell example, but ensure you are correctly mounting your persistent volume. Please try to limit the time the GPU shell is running while not actively using the GPU.
- Once your code is ready, run it as a GPU workload, ensuring it automatically exits once the job is complete. See the GPU workload example.
Simple ephemeral shell
$ kubectl run --rm -it --image debian:bookworm ephemeral-shell -- /bin/bash
If you don't see a command prompt, try pressing enter.
root@ephemeral-shell:/# nproc
256
root@ephemeral-shell:/# exit
exit
Session ended, resume using 'kubectl attach ephemeral-shell -c ephemeral-shell -i -t' command when the pod is running
pod "ephemeral-shell" deleted
The shell and any files in its filesystem are deleted immediately upon exit. No data is preserved.
Simple persistent shell
Your data will not be preserved across restarts. See the next “Persistent volume” example to preserve data. We cannot recover data lost due to not using persistent volumes.
# simple-persistent-shell.yaml
apiVersion: v1
kind: Pod
metadata:
  name: simple-persistent-shell
spec:
  restartPolicy: Never
  terminationGracePeriodSeconds: 1
  containers:
    - name: app
      image: debian:bookworm
      command: ['/bin/bash', '-c', 'sleep inf']
$ # create the pod
$ kubectl apply -f simple-persistent-shell.yaml
pod/simple-persistent-shell created

$ # open a shell session
$ kubectl exec -it -f simple-persistent-shell.yaml -- bash
root@simple-persistent-shell:/# exit
exit

$ # later, delete the pod
$ kubectl delete -f simple-persistent-shell.yaml
pod "simple-persistent-shell" deleted
Persistent volume
If you want to preserve data across reboots, use a persistent volume.
# persistent-volume.yaml
apiVersion: v1
kind: PersistentVolumeClaim
metadata:
  name: persistent-volume
spec:
  accessModes: [ReadWriteOnce]
  resources:
    requests:
      storage: 100Gi
The volume cannot be resized after creation. Ensure that you allocate enough space for your needs, according to your approved storage quota.
If you need more storage space,
- Request a temporary storage quota increase.
- Create a new PersistentVolumeClaim with the new size.
- Copy your data from the old volume to the new volume.
- Delete the old PersistentVolumeClaim.
# persistent-volume-shell.yaml
apiVersion: v1
kind: Pod
metadata:
  name: persistent-volume-shell
spec:
  restartPolicy: Never
  volumes:
    - name: my-volume
      persistentVolumeClaim:
        claimName: persistent-volume
  terminationGracePeriodSeconds: 1
  containers:
    - name: app
      image: debian:bookworm
      command: ['/bin/bash', '-c', 'sleep inf']
      volumeMounts:
        - name: my-volume
          mountPath: /data
$ # create resources
$ kubectl apply -f persistent-volume.yaml
persistentvolumeclaim/persistent-volume created
$ kubectl apply -f persistent-volume-shell.yaml
pod/persistent-volume-shell created

$ # open a shell session
$ kubectl exec -it -f persistent-volume-shell.yaml -- bash
root@persistent-volume-shell:/# df -h /data
Filesystem      Size  Used Avail Use% Mounted on
/dev/md127p1    100G     0  100G   0% /data
In this example, we mount a 100 GiB volume to the /data directory. Your data
will be irrecoverably lost if the PersistentVolumeClaim is deleted.
GPU shell
Use this example to spawn an ephemeral shell with access to GPU resources.
The example GPU shell will auto terminate after 25 minutes, DO NOT use for consistent workloads.
# gpu-shell.yaml
apiVersion: v1
kind: Pod
metadata:
  name: gpu-shell
spec:
  restartPolicy: Never
  terminationGracePeriodSeconds: 1
  containers:
    - name: app
      image: nvcr.io/nvidia/cuda:12.5.0-base-ubuntu22.04
      command: ['/bin/bash', '-c', 'sleep 1500 && echo "Time expired. Exiting..." && exit']
      resources:
        limits:
          nvidia.com/gpu: 4
$ kubectl apply -f gpu-shell.yaml
pod/gpu-shell created

$ kubectl exec -it -f gpu-shell.yaml -- bash
root@gpu-shell:/# nvidia-smi
Tue Jun  4 11:55:12 2024
+---------------------------------------------------------------------------------------+
| NVIDIA-SMI 535.161.08             Driver Version: 535.161.08   CUDA Version: 12.5     |
|-----------------------------------------+----------------------+----------------------+
| GPU  Name                 Persistence-M | Bus-Id        Disp.A | Volatile Uncorr. ECC |
| Fan  Temp   Perf          Pwr:Usage/Cap |         Memory-Usage | GPU-Util  Compute M. |
|                                         |                      |               MIG M. |
|=========================================+======================+======================|
|   0  NVIDIA A100-SXM4-40GB          On  | 00000000:07:00.0 Off |                    0 |
| N/A   24C    P0              53W / 400W |      0MiB / 40960MiB |      0%      Default |
|                                         |                      |             Disabled |
+-----------------------------------------+----------------------+----------------------+
|   1  NVIDIA A100-SXM4-40GB          On  | 00000000:0F:00.0 Off |                    0 |
| N/A   22C    P0              51W / 400W |      0MiB / 40960MiB |      0%      Default |
|                                         |                      |             Disabled |
+-----------------------------------------+----------------------+----------------------+
|   2  NVIDIA A100-SXM4-40GB          On  | 00000000:B7:00.0 Off |                    0 |
| N/A   28C    P0              54W / 400W |      0MiB / 40960MiB |      0%      Default |
|                                         |                      |             Disabled |
+-----------------------------------------+----------------------+----------------------+
|   3  NVIDIA A100-SXM4-40GB          On  | 00000000:BD:00.0 Off |                    0 |
| N/A   29C    P0              58W / 400W |      0MiB / 40960MiB |      0%      Default |
|                                         |                      |             Disabled |
+-----------------------------------------+----------------------+----------------------+

+---------------------------------------------------------------------------------------+
| Processes:                                                                            |
|  GPU   GI   CI        PID   Type   Process name                            GPU Memory |
|        ID   ID                                                             Usage      |
|=======================================================================================|
|  No running processes found                                                           |
+---------------------------------------------------------------------------------------+
In this example, we create a pod with 4 GPUs attached. These GPU resources are exclusively allocated to your pod as long as this pod is running.
If you allocate GPU resources but let the GPU idle for extended periods of time, we will terminate your pod without warning. Furthermore, your access may be permanently restricted. We actively monitor GPU utilization and take action if we detect abuse.
This warning also applies for “guaranteed” CPU or memory quotas.
GPU workload
Similar to the GPU shell, but exit (and de-allocate GPU resources) once the process terminates.
# gpu-workload.yaml
apiVersion: v1
kind: Pod
metadata:
  name: gpu-workload
spec:
  terminationGracePeriodSeconds: 1
  restartPolicy: Never
  containers:
    - name: app
      image: nvcr.io/nvidia/cuda:12.5.0-base-ubuntu22.04
      command: ['/bin/bash', '-c', 'nvidia-smi']
      resources:
        limits:
          nvidia.com/gpu: 4
Note the restartPolicy: Never and the modified command lines.
$ # create the pod
$ kubectl apply -f gpu-workload.yaml
pod/gpu-workload created

$ # watch the pod start and eventually exit
$ kubectl get -f gpu-workload.yaml --watch
NAME           READY   STATUS    RESTARTS   AGE
gpu-workload   1/1     Running   0          6s
gpu-workload   0/1     Completed   0          7s
^C

$ # view logs (standard outputs)
$ kubectl logs gpu-workload --follow
Tue Jun  4 12:14:54 2024
+---------------------------------------------------------------------------------------+
| NVIDIA-SMI 535.161.08             Driver Version: 535.161.08   CUDA Version: 12.5     |
|-----------------------------------------+----------------------+----------------------+
| GPU  Name                 Persistence-M | Bus-Id        Disp.A | Volatile Uncorr. ECC |
| Fan  Temp   Perf          Pwr:Usage/Cap |         Memory-Usage | GPU-Util  Compute M. |
|                                         |                      |               MIG M. |
|=========================================+======================+======================|
|   0  NVIDIA A100-SXM4-40GB          On  | 00000000:07:00.0 Off |                    0 |
| N/A   24C    P0              53W / 400W |      0MiB / 40960MiB |      0%      Default |
|                                         |                      |             Disabled |
+-----------------------------------------+----------------------+----------------------+
|   1  NVIDIA A100-SXM4-40GB          On  | 00000000:0F:00.0 Off |                    0 |
| N/A   22C    P0              51W / 400W |      0MiB / 40960MiB |      0%      Default |
|                                         |                      |             Disabled |
+-----------------------------------------+----------------------+----------------------+
|   2  NVIDIA A100-SXM4-40GB          On  | 00000000:B7:00.0 Off |                    0 |
| N/A   28C    P0              54W / 400W |      0MiB / 40960MiB |      0%      Default |
|                                         |                      |             Disabled |
+-----------------------------------------+----------------------+----------------------+
|   3  NVIDIA A100-SXM4-40GB          On  | 00000000:BD:00.0 Off |                    0 |
| N/A   29C    P0              61W / 400W |      0MiB / 40960MiB |      0%      Default |
|                                         |                      |             Disabled |
+-----------------------------------------+----------------------+----------------------+

+---------------------------------------------------------------------------------------+
| Processes:                                                                            |
|  GPU   GI   CI        PID   Type   Process name                            GPU Memory |
|        ID   ID                                                             Usage      |
|=======================================================================================|
|  No running processes found                                                           |
+---------------------------------------------------------------------------------------+

$ # clean up the pod
$ kubectl delete -f gpu-workload.yaml
pod "gpu-workload" deleted
Logs may be truncated to save space, and will be permanently deleted if you delete your pod. If you want to preserve logs, we recommend writing them to a persistent volume.
Completed pods do not use node resources. Still, it is a good idea to clean up completed pods you are no longer using, as they can clutter your namespace and may result in name collisions.
Increasing shared memory for PyTorch DataLoader
By default, /dev/shm (shared memory) is limited to 64MB. This can cause issues
when using PyTorch’s DataLoader with multiple workers (num_workers > 0), as it
relies on shared memory for inter-process communication.
To increase the shared memory size, mount an emptyDir volume with medium: Memory:
# pytorch-workload.yaml
apiVersion: v1
kind: Pod
metadata:
  name: pytorch-workload
spec:
  terminationGracePeriodSeconds: 1
  restartPolicy: Never
  volumes:
    - name: dshm
      emptyDir:
        medium: Memory
  containers:
    - name: app
      image: pytorch/pytorch:2.1.0-cuda12.1-cudnn8-runtime
      command: ['/bin/bash', '-c', 'df -h /dev/shm && python train.py']
      resources:
        limits:
          nvidia.com/gpu: 1
      volumeMounts:
        - name: dshm
          mountPath: /dev/shm
This mounts a memory-backed filesystem at /dev/shm, allowing it to use
available memory instead of being limited to 64MB. You can verify the change:
$ kubectl exec -it pytorch-workload -- df -h /dev/shm
Filesystem      Size  Used Avail Use% Mounted on
shm             125G     0  125G   0% /dev/shm
The memory used by /dev/shm counts against your pod’s memory limit. Ensure
your pod has sufficient memory allocated.